


A big part of our inspiration when starting Trigger.dev was the experience of using Firestore Cloud Functions to build some complex backend orchestration tasks built on top of triggering functions whenever a document was created, updated, or deleted:
import functions from "firebase-functions";

export const myFunction = functions.firestore
  .document("todos/{todoId}")
  .onWrite((change, context) => {
    /* ... */
  });
This powerful primitive allowed us to build a lot of functionality very quickly. But since then we've left the world of closed-source, locked-in platforms behind: Trigger.dev is an open-source, self-hostable project.
So is Supabase. How cool would it be if this was possible:
client.defineJob({
  id: "my-job",
  name: "My Job",
  trigger: supabase.onInserted({ table: "todos" }),
  run: async (payload, io) => {},
});
Introducing @trigger.dev/supabase
Well, we're happy to announce that it is with our new Supabase integration. We've added support for Triggering jobs whenever a row is inserted, updated, or deleted in a Supabase project. And you aren't limited to just your own tables.
The Supabase integration supports specifying a schema as well as the table name. This means you can listen to changes in the auth schema, like when a user is created:
client.defineJob({
  id: "my-job",
  name: "My Job",
  trigger: supabase.onInserted({
    schema: "auth",
    table: "users",
  }),
  run: async (payload, io) => {},
});
Or trigger on a user update and check to see if their email was confirmed by filtering on the old_record:
client.defineJob({
  id: "my-job",
  name: "My Job",
  // Trigger when a user confirms their email
  trigger: supabase.onUpdated({
    schema: "auth",
    table: "users",
    filter: {
      old_record: {
        email_confirmed_at: [{ $isNull: true }],
      },
      record: {
        email_confirmed_at: [{ $isNull: false }],
      },
    },
  }),
  run: async (payload, io) => {},
});
Want to react to new file uploads to Supabase storage? No problem:
client.defineJob({
  id: "my-job",
  name: "My Job",
  trigger: supabase.onInserted({
    schema: "storage",
    table: "objects",
  }),
  run: async (payload, io) => {},
});
Only trigger on new PNG files uploaded to a specific bucket, under a specific path? Easy:
client.defineJob({
  id: "my-job",
  name: "My Job",
  trigger: supabase.onInserted({
    schema: "storage",
    table: "objects",
    trigger: triggers.onInserted({
      schema: "storage",
      table: "objects",
      filter: {
        record: {
          bucket_id: ["uploads"],
          name: [
            {
              $endsWith: ".png",
            },
          ],
          path_tokens: [
            {
              $includes: "images",
            },
          ],
        },
      },
    }),
  }),
  run: async (payload, io) => {},
});
And those are just a few examples. Here's a few other things you can do with the Supabase integration:
- Get notified when a user updates their password
- Automatically email customers when their orders are updated or shipped
- Sync data with external services or APIs when certain database fields are updated
- Send push notifications to mobile devices when new messages are received
- Adjust prices on Shopify based on changes to product costs or availability
- Sync customer subscriptions in Stripe when a Supabase user updates
- Automatically add new users to a mailing list in Loops.so
- Sync data from Supabase tables to Google Sheets for collaboration or reporting
- Send SMS notifications to users based on specific events or updates in Supabase
- Send a notification to Slack whenever a user requests a password change
- Sync uploaded files to Cloudflare R2 for backup
Background jobs with Next.js and Supabase
Let's step through an example of how you might use this integration to build a background job that sends a few welcome emails when a user confirms their email address.
NOTE: This example is based on our Supabase Onboarding Emails example, which you can clone and run locally to try it out.
Prepare Supabase & Next.js
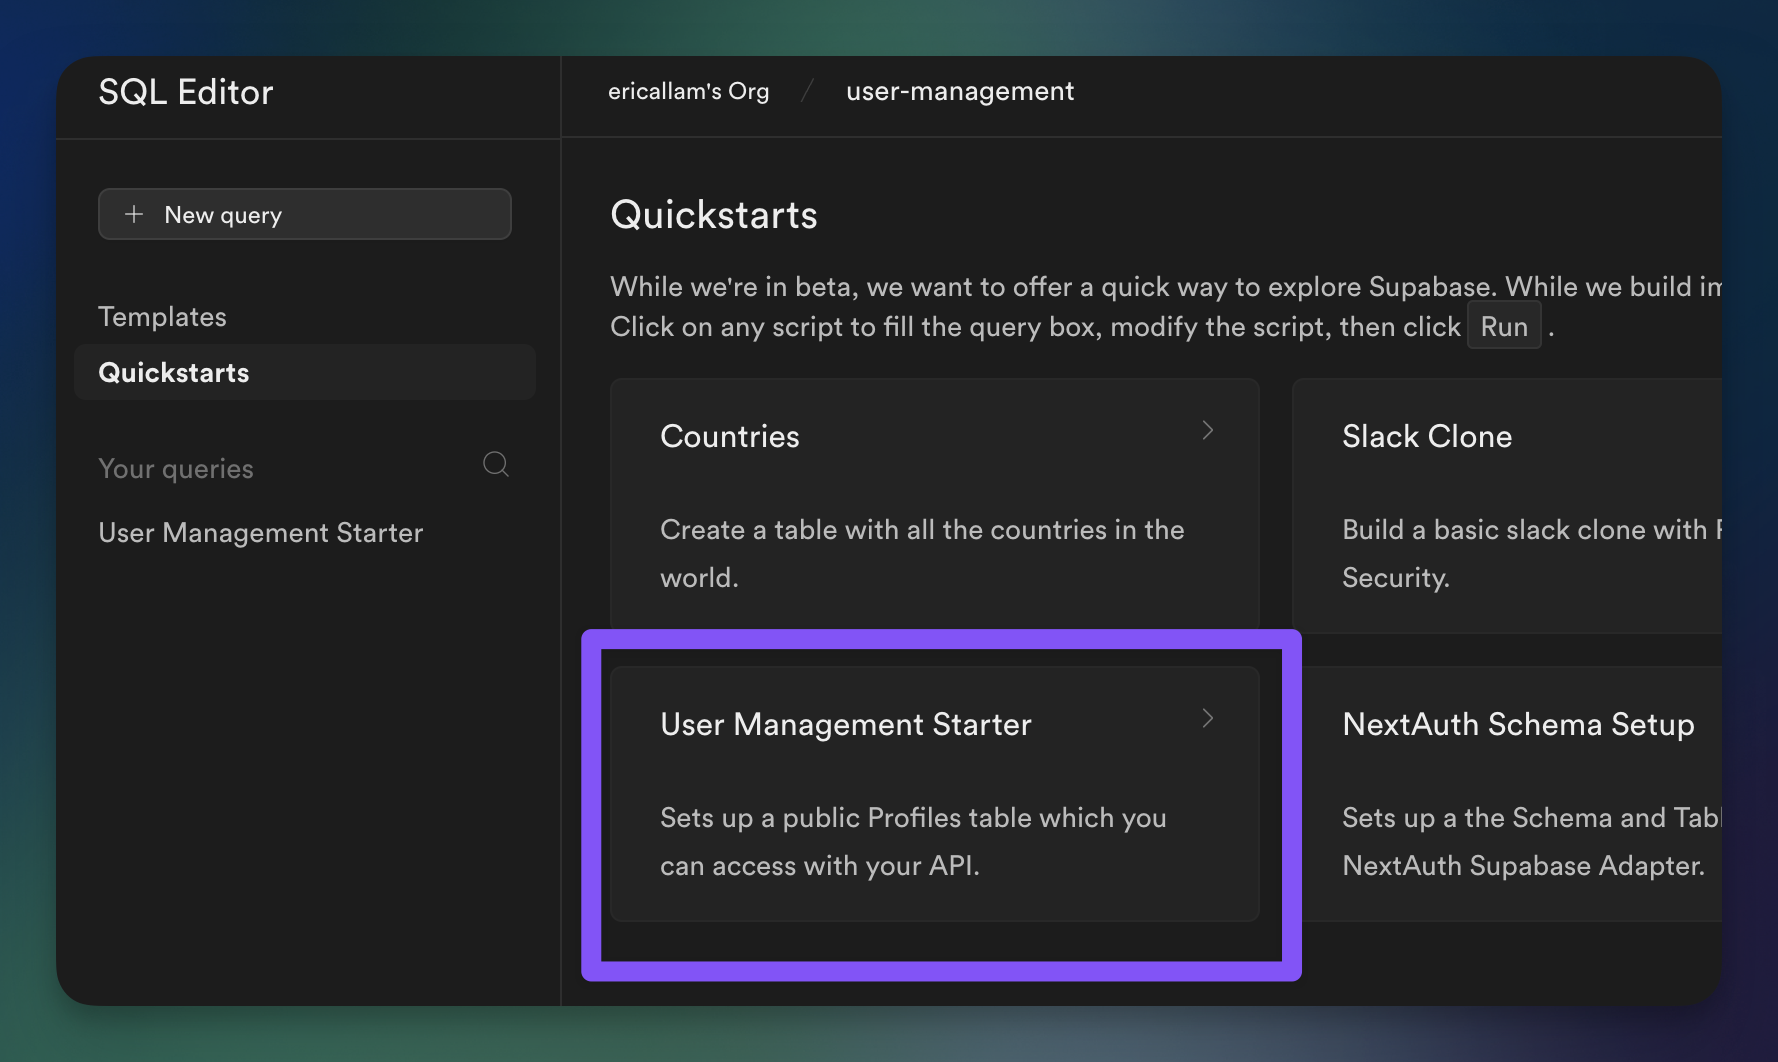
Create a new project in Supabase and then head over to the SQL Editor (with a fancy new AI query builder) and choose the "User Management Starter" Quickstart:
Then, create a new Next.js app with Supabase support:
npx create-next-app@latest -e with-supabase supabase-onboarding-emails
cd supabase-onboarding-emails
Rename the .env.local.example file to .env.local and add your Supabase URL and public key:
NEXT_PUBLIC_SUPABASE_URL=your-project-url
NEXT_PUBLIC_SUPABASE_ANON_KEY=your-anon-key
Finally, we'll go ahead and Generate the Typescript types now as we'll be using them in a bit:
npx supabase gen types typescript --project-id <your project id> --schema public --schema auth > supabase-types.ts
Next, we'll initialize Trigger.dev in the project (you'll need to sign up for an account first and create your first project)
npx @trigger.dev/cli@latest init
Edit the middleware.ts file and add the following code to exclude the Trigger.dev endpoint from the Supabase auth middleware:
// Match all routes other than /api/trigger
export const config = {
  matcher: ["/((?!api/trigger).*)"],
};
Add Supabase & Resend integrations
Add the @trigger.dev/supabase package to your project (along with @trigger.dev/resend for email sending)
npm add @trigger.dev/supabase @trigger.dev/resend
Add your Resend.com API key to the .env.local file:
RESEND_API_KEY=your-api-key
Edit the jobs/examples.ts file and replace with the following code:
import { client } from "@/trigger";
import { Database } from "@/supabase-types";
import { SupabaseManagement } from "@trigger.dev/supabase";
import { Resend } from "@trigger.dev/resend";

// Use OAuth to authenticate with Supabase Management API
const supabaseManagement = new SupabaseManagement({
  id: "supabase-management",
});

// Use the types we generated earlier
const db = supabaseManagement.db<Database>(
  process.env.NEXT_PUBLIC_SUPABASE_URL!
);

const resend = new Resend({
  id: "resend",
  apiKey: process.env.RESEND_API_KEY!,
});

client.defineJob({
  id: "welcome-email-campaign",
  name: "Welcome Email Campaign",
  version: "1.0.0",
  trigger: db.onUpdated({
    // Trigger this job whenever a user is confirmed
    schema: "auth",
    table: "users",
    filter: {
      old_record: {
        email_confirmed_at: [{ $isNull: true }],
      },
      record: {
        email_confirmed_at: [{ $isNull: false }],
      },
    },
  }),
  integrations: {
    resend,
  },
  run: async (payload, io, ctx) => {
    // payload.record is typed based on the Supabase schema
    if (!payload.record.email) {
      return;
    }

    await io.resend.sendEmail("email-1", {
      to: payload.record.email,
      subject: `Thanks for joining Acme Inc`,
      text: `Hi there, welcome to our community! This is the first email we send you to help you get started.`,
      from: "eric@acme.com",
    });

    await io.wait("⌛", 60); // Waits for 1 minute but you might want to wait longer

    await io.resend.sendEmail("email-2", {
      to: payload.record.email,
      subject: `Here are some tips to get started`,
      text: `Hi there, welcome to our community! This is the second email we send you to help you get started.`,
      from: "eric@acme.com",
    });
  },
});
Authenticate to the Supabase Management API
The Supabase Triggers use the Supabase Management API to register the triggers in your Supabase projects.
You can authenticate using a Personal Access Token or via the new Supabase Management API OAuth implementation, which we are using in this example.
Login to Trigger.dev and navigate to the project "Integrations" page. Select the "Supabase Management" integration and configure it like so:
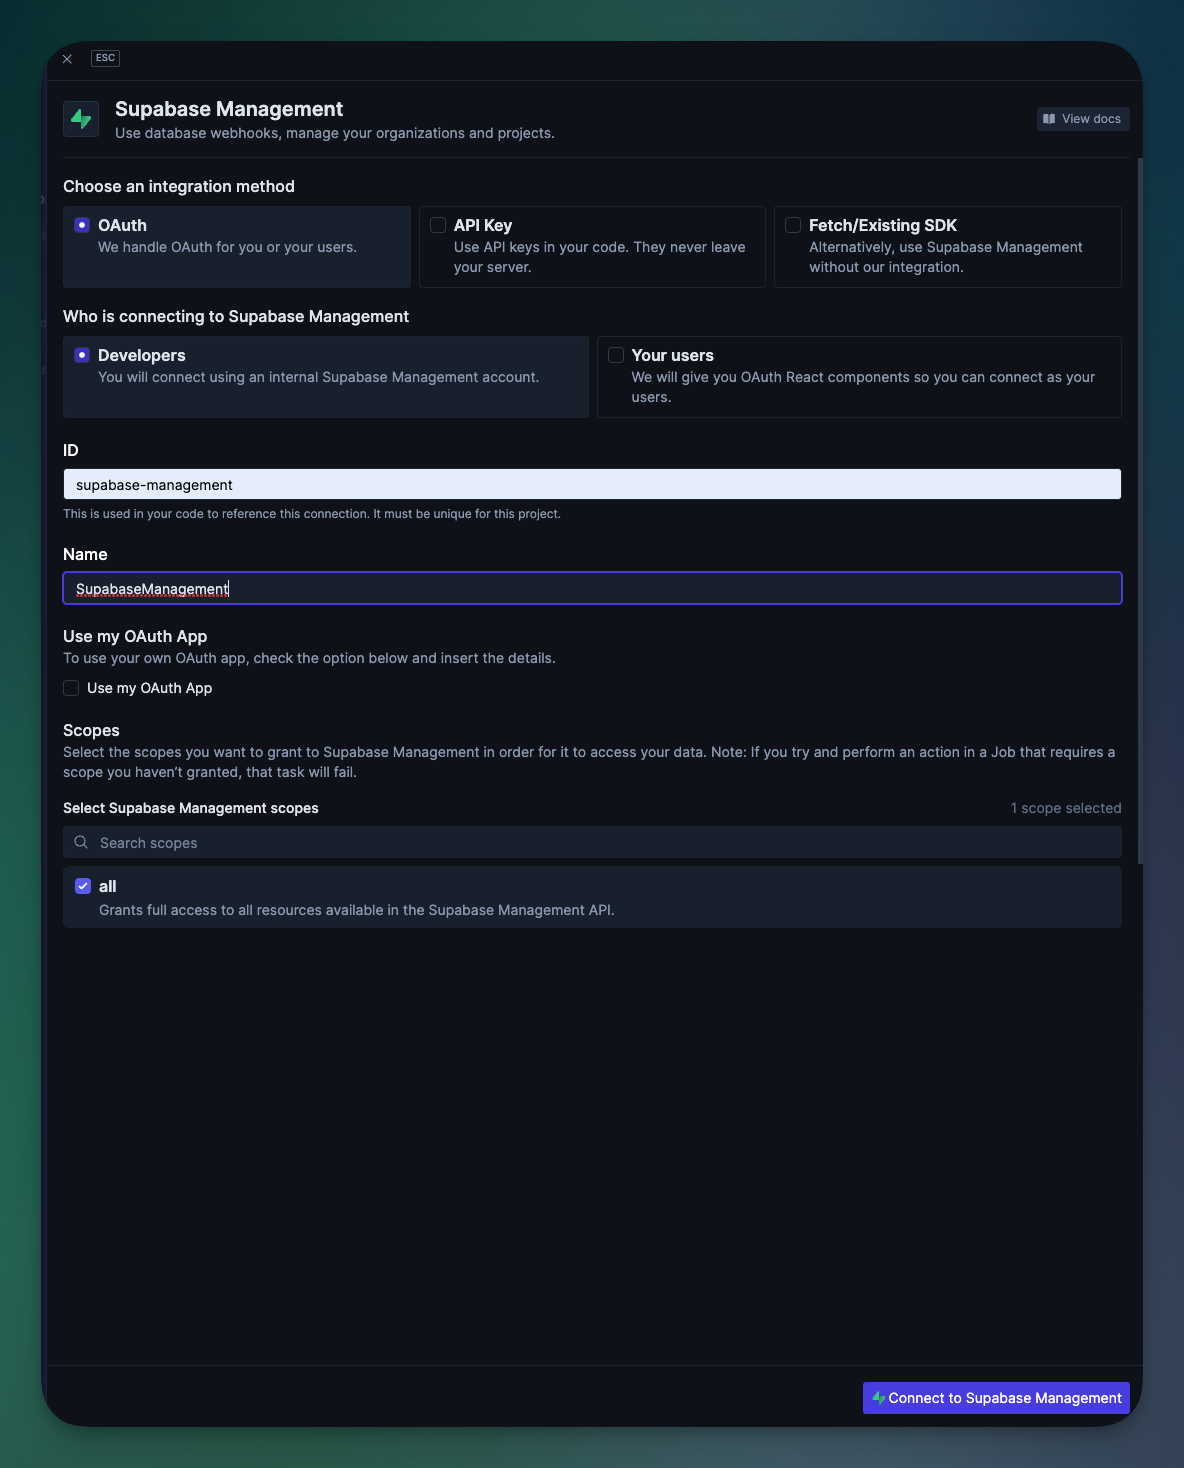
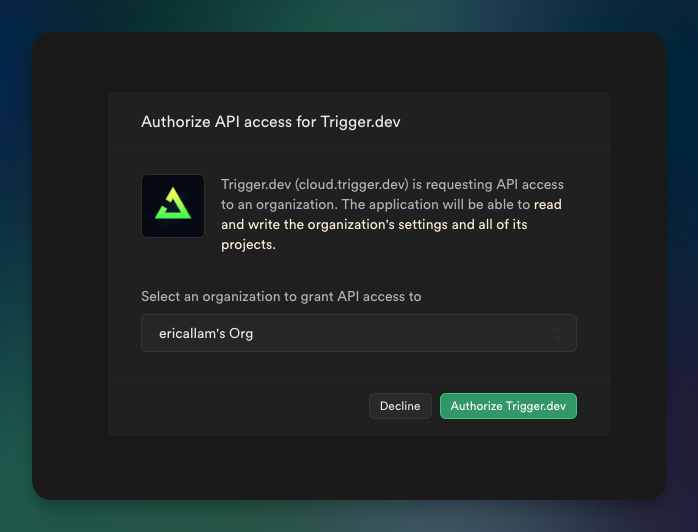
Authorize access to your Supabase project and then you'll be ready to run the job 🚀
Run and test the job
Now you are ready to run the Next.js app and test the job. Run the following command to start the Next.js app:
npm run dev
And then in a separate terminal, run the following command to start the Trigger.dev agent:
npx @trigger.dev/cli dev
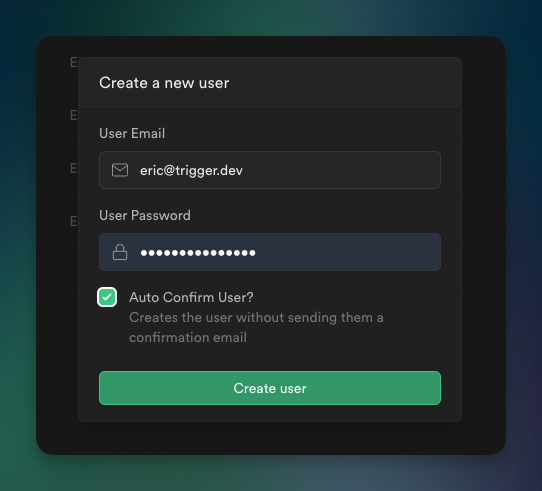
Head back to your Supabase Dashboard -> Auth, and create a new user (keep "Auto Confirm User?" checked)
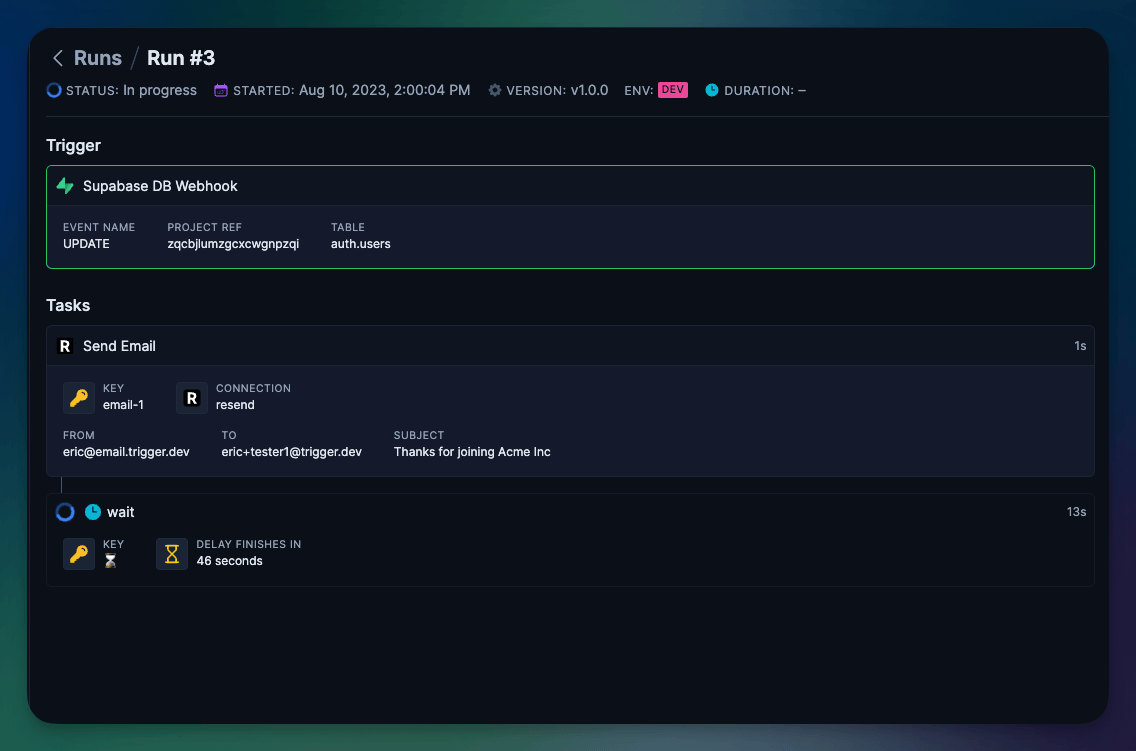
Then navigate over to your Trigger.dev project dashboard and you should see the job running ✨
How it works
Trigger.dev supports triggering jobs through Webhooks, which integrations can expose via Webhook Triggers. For example, this GitHub trigger will register a webhook for the issue event on the triggerdotdev/trigger.dev repository behind the scenes:
import { Github } from "@trigger.dev/github";

const github = new Github({
  id: "github",
  token: process.env.GITHUB_TOKEN!,
});

client.defineJob({
  id: "github-integration-on-issue",
  name: "GitHub Integration - On Issue",
  version: "0.1.0",
  trigger: github.triggers.repo({
    event: events.onIssue,
    owner: "triggerdotdev",
    repo: "trigger.dev",
  }),
  run: async (payload, io, ctx) => {
    //do stuff
  },
});
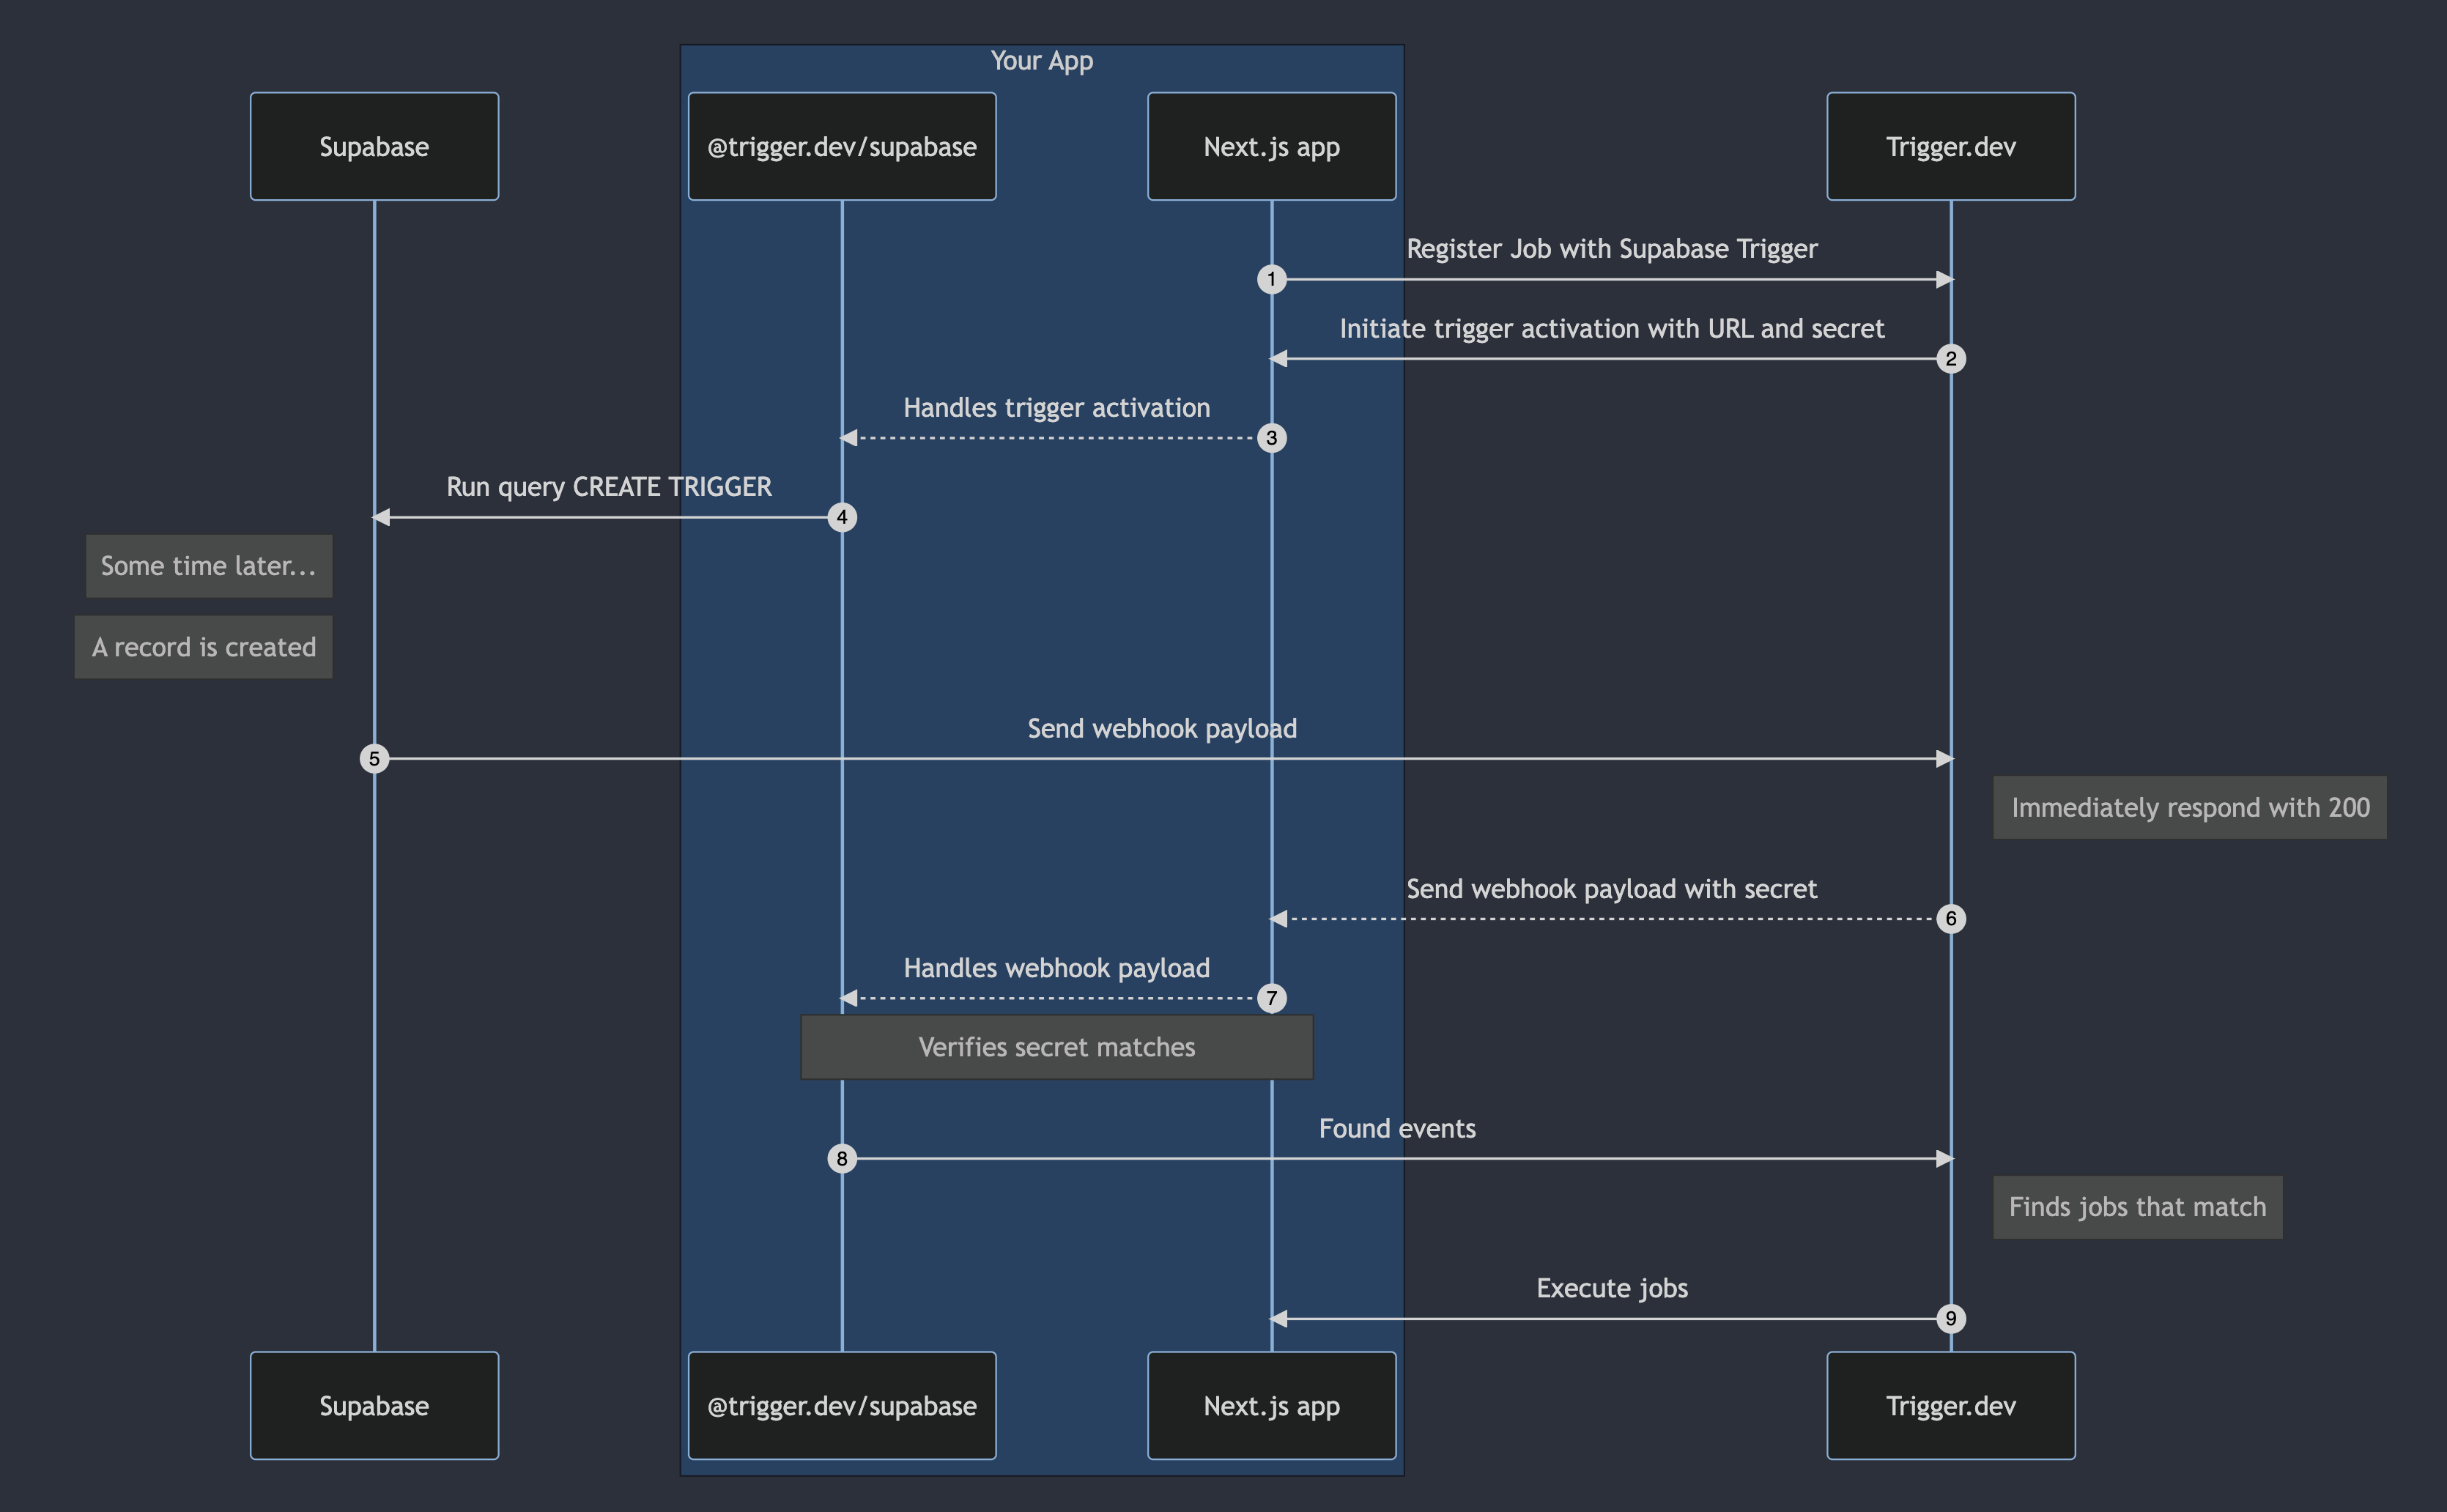
Internally, Trigger.dev provides a URL and a secret to the Github integration which uses it to register a webhook via the Github REST API.
This is exactly how the Supabase Integration works, except it uses Supabase Database Webhooks, which allow you to make an HTTP request whenever there is a change in a Supabase table.
We run the following pseudo-SQL to create a webhook for the todos table in the public schema:
CREATE OR REPLACE TRIGGER triggername
AFTER UPDATE on "public"."todos"
FOR EACH ROW
  EXECUTE FUNCTION supabase_functions.http_request('https://api.trigger.dev/api/v1/sources/http/abc123', 'POST', '{"Content-type":"application/json", "Authorization": "Bearer ${secret}" }', '{}', '1000')
The secret is a secret string that is generated by Trigger.dev when a job uses a Supabase trigger. It is used to verify that the webhook request is coming from Supabase.
Here's a high-level overview of the flow for registering a Supabase trigger:
NOTE: We try to limit how many database webhooks we create. For example, if you have 10 jobs that trigger off the same table, we will only create two webhooks (1 for each Trigger.dev environment,
prodanddev)
Automate your Supabase account
We've also added full support to use the new Supabase Management API inside your jobs to automate your Supabase account, allowing you to create and manage Supabase projects, databases, and more.
For example, you could create a job that automatically creates a new Supabase project and database for each new user that signs up to your app (you might want to charge for this feature 😉)
import { client } from "./trigger";
import { eventTrigger } from "@trigger.dev/sdk";
import { SupabaseManagement } from "@trigger.dev/supabase";

const supabaseManagement = new SupabaseManagement({
  id: "supabase-management",
});

client.defineJob({
  id: "create-supbase-project",
  name: "Create Supabase Project",
  version: "0.1.0",
  trigger: eventTrigger({ name: "user.created" }),
  integrations: {
    supabaseManagement,
  },
  run: async (payload, io) => {
    await io.supabaseManagement.createProject("🚀", {
      db_pass: payload.password,
      name: payload.name,
      organization_id: process.env.SUPABASE_ORGANIZATION_ID,
      plan: "pro",
      region: "us-east-1",
      kps_enabled: true,
    });
  },
});
For more information on what can be done in your Supabase Account, check out the Supabase Management API reference. The functions and types are powered by the supabase-management-js package, which we maintain.
Wrap supabase-js in tasks
When working with Trigger.dev Jobs, it's almost always necessary to wrap operations in a Task to enable retries and job Resumability.
For this, we've also exposed a wrapper for the supabase-js client that allows you to wrap your Supabase operations in a Task:
NOTE: We currently support
service_roleauthentication, which should be kept secret and only used on the server, which is why it's not prefixed withNEXT_PUBLIC_.
import { db } from "./db";
import { Supabase } from "@trigger.dev/supabase";

const supabase = new Supabase({
  id: "supabase",
  supabaseKey: process.env.SUPABASE_SERVICE_ROLE_KEY!,
  supabaseUrl: process.env.NEXT_PUBLIC_SUPABASE_URL!,
});

client.defineJob({
  id: "example",
  name: "Example",
  version: "0.1.0",
  trigger: db.onInserted({ table: "todos" }),
  integrations: {
    supabase,
  },
  run: async (payload, io, ctx) => {
    const user = await io.supabase.runTask("fetch-user", async (db) => {
      const { data, error } = await db.auth.admin.getUserById(
        payload.record.user_id
      );

      if (error) {
        throw error;
      }

      return data.user;
    });

    return user;
  },
});
Self-hosting Trigger.dev using Supabase
Trigger.dev is built on top of PostgreSQL. That means you can easily self-host Trigger.dev and run it on your Supabase database (either on Supabase Cloud or self-hosted).
Our contributor nicktrn has written up a handy guide on how to self-host Trigger.dev using Docker and Supabase.
What's next?
We're looking into other ways of integrating Supabase with Trigger.dev, such as hosting and running your jobs on Supabase Edge Functions. If you have any ideas or requests, please let us know!
We're excited to see what you build with Trigger.dev and Supabase. If you have any questions, feedback, or ideas, please join our Discord or head over to our Github repo and drop an issue (or a ⭐).